
Install WMX Runtime#
What is WMX Motion Engine?#
The WMX motion engine is MOVENSYS’s software-defined motion control. It replaces the dedicated hardware motion controller used in a conventional setup. The engine runs directly on the PC and drives the servos over EtherCAT. It handles both cyclic process data (PDO) and configuration data (SDO) on the bus.
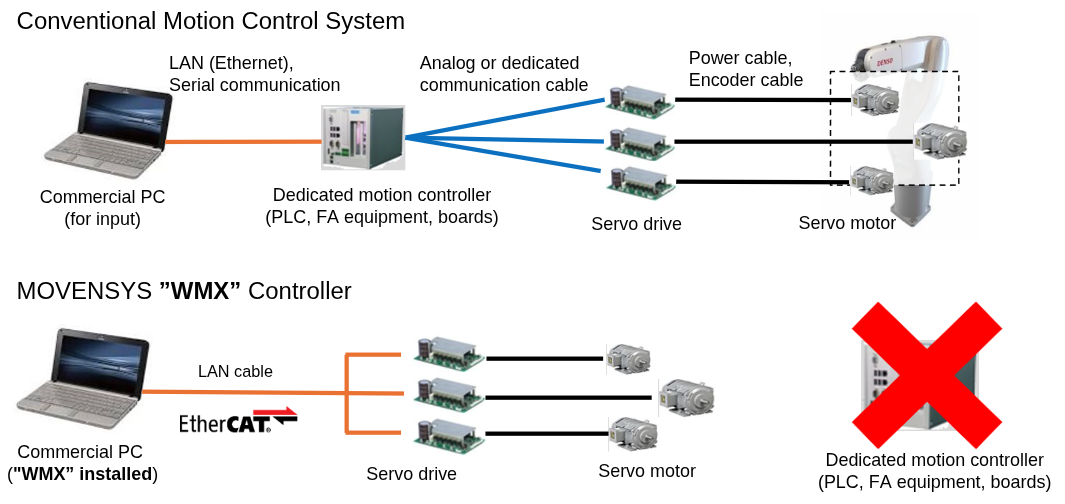
With WMX there is no separate motion controller. The PC runs the software motion engine and talks to the servo drives directly over EtherCAT.#
Running the motion on a single PC removes the separate controller box and the cabling that connects it. This shrinks the overall footprint and lowers the parts count and cost. Fewer components also mean less to wire, mount, and maintain. Performance improves at the same time, because commands no longer take an extra hop through external hardware. The smaller size and lighter weight make WMX a strong fit for robots and mobile machines where space and payload are limited.
The motion runs in software on a real-time kernel instead of on fixed controller hardware. This lets it scale far beyond a conventional controller. A typical hardware controller handles up to 32 axes on a 250 µs to 1 ms cycle depending the hardware. WMX software motion drives up to 128 axes on a 31.25 µs to 1 ms cycle and keeps deterministic real-time performance.
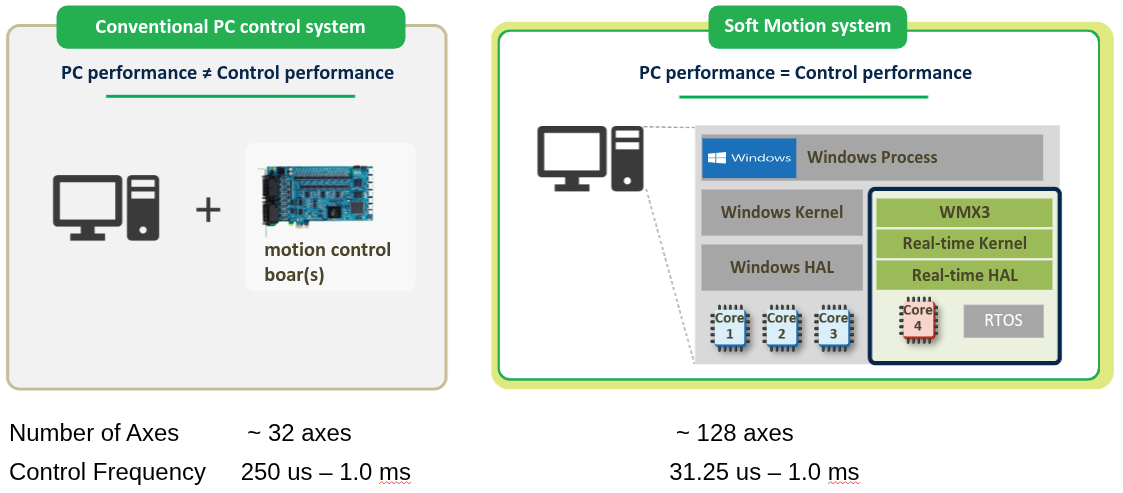
Conventional hardware control handles up to 32 axes on a 250 µs to 1 ms cycle. WMX software motion drives up to 128 axes on a 31.25 µs to 1 ms cycle depending the hardware.#
The engine is built on MOVENSYS’s proprietary Soft Motion technology and holds the highest EtherCAT master. It exposes more than 200 APIs for trajectory conversion, EtherCAT and fieldbus communication, digital and analog I/O, and engine control. Users can build applications in C, C++, C#, or Python. This is the same engine that WMX R2 drives underneath the ROS2 layer. Planner output such as MoveIt2 and Nav2 trajectories is handed to the engine, and the engine turns it into the precisely timed servo commands that the drives execute on a fixed cycle.
WMX has been proven over 25 years in demanding industrial fields such as semiconductor and precision robotics. The runtime is free to evaluate in renewable 6-hour sessions that you extend by restarting the engine. A commercial license removes the time limit for production use.
With the real-time kernel in place (see Computer Setup), install the WMX runtime, isolate the CPU cores for the real-time threads, and point the runtime at the EtherCAT NIC.
1. Install the WMX runtime#
WMX3 is MOVENSYS’s software-defined motion control stack. It connects the PC to the servo drives over EtherCAT and provides the deterministic cycle loop. Select the tab that matches your hardware.
Install WMX3 — extract the archive and run the installer:
unzip 20260729_WMX3_v3.7_Linux_x86.zip
sudo dpkg -i *wmx3-installer.deb
Download WMX3 for jetson/arm64
Install WMX3 — extract the archive and run the installer:
unzip 20260729_WMX3_v3.7_Linux_ARM64.zip
sudo dpkg -i *wmx3-installer.deb
The installer places the WMX3 runtime at /opt/wmx3/. Confirm the required
headers and libraries are present:
ls /opt/wmx3/include/WMX3Api.h
ls /opt/wmx3/lib/libwmx3api.a
ls /opt/wmx3/lib/libimdll.so
All files must exist before proceeding. If any are missing, re-run the installer or contact your MOVENSYS representative.
2. Isolate cores for WMX#
Determinism comes from dedicating CPU cores to the WMX real-time threads and
keeping housekeeping work off them. Add the isolation parameters to the boot
configuration for your platform. The examples below reserve core 3 for the
control loop and core 2 for the universal NIC kernel driver, so both cores
are isolated on every platform.
Edit /etc/default/grub and set GRUB_CMDLINE_LINUX:
GRUB_CMDLINE_LINUX="quiet splash isolcpus=2,3 nohz_full=2,3 rcu_nocbs=2,3 irqaffinity=0,1 acpi_irq_nobalance noirqbalance"
Apply the change and reboot:
sudo update-grub
sudo reboot
Edit /etc/default/grub and set GRUB_CMDLINE_LINUX_DEFAULT:
GRUB_CMDLINE_LINUX_DEFAULT="isolcpus=managed_irq,domain,2,3 nohz_full=2,3 rcu_nocbs=2,3 irqaffinity=0,1 intel_pstate=disable processor.max_cstate=1 idle=poll"
Cores
2,3are reserved for WMX — the control loop plus the universal NIC kernel driver — and cores0,1handle housekeeping.idle=polltrades power for latency; measure withcyclictestto confirm it helps on your hardware.On hybrid Intel silicon (Core Ultra Series 3 mixes P-cores, E-cores, and LP-E-cores), pin the control loop to isolated P-cores for the most consistent latency.
Apply the change and reboot:
sudo update-grub
sudo reboot
The Jetson boards boot via U-Boot/extlinux, not GRUB. Append the same
isolation parameters to the APPEND line in
/boot/extlinux/extlinux.conf:
isolcpus=2,3 nohz_full=2,3 rcu_nocbs=2,3 irqaffinity=0,1 acpi_irq_nobalance noirqbalance
Then reboot:
sudo reboot
Pin the WMX engine to the isolated core. Isolating the core keeps other work
off it; you still have to tell the WMX engine to run there. Edit
/opt/wmx3/Module.ini and set CpuAffinity to a hexadecimal bit mask where
each bit selects a core. Core 3 is bit 3 — 0b00001000 — which is 0x08 in
hexadecimal, so use 08:
CpuAffinity = 08
Pin the WMX control loop to the isolated core; pin AI workloads such as VLM,
Whisper, or OpenVINO to the remaining cores. A cgroup v2 slice (cpuset +
cpu.weight) keeps the AI stack off the control cores while keeping GPU/NPU
access simple.
3. Set the WMX3 platform#
WMX3 loads a platform that decides whether the engine drives real hardware
over EtherCAT or runs against a simulated bus. The platforms are declared in
/opt/wmx3/Module.ini; enable the one you want with disable = 0 and turn
the other off with disable = 1. Select the tab that matches how you want to
run the engine.
Drive real servo drives over EtherCAT. Enable the EtherCAT platform and disable the simulation platform:
[Platform 0]
Location = ./platform/ethercat
DllName = ec_platform.so
NumOfMaster = 1
disable = 0

[Platform 1]
Location = ./platform/simu
DllName = simu_platform.so
NumOfMaster = 1
disable = 1
Run the engine against a simulated bus with no hardware attached. Enable the simulation platform and disable the EtherCAT platform:
[Platform 0]
Location = ./platform/ethercat
DllName = ec_platform.so
NumOfMaster = 1
disable = 1

[Platform 1]
Location = ./platform/simu
DllName = simu_platform.so
NumOfMaster = 1
disable = 0
4. Change the cyclic period#
Modify /opt/wmx3/platform/ethercat/ec_network.def:
[Master 0]
CommCycle=1000 #milliseconds
Note
Jetson developer kit (arm64).
Reduce the cycle time to
CommCycle=2000. Several Jetson developer kit NICs cannot sustain the shortest cycles.Increase the transmission timeout to
TransmitTimeout=1500. Several Jetson developer kit boards are slower to transmit EtherCAT packets.
5. Configure the EtherCAT NIC#
WMX3’s EtherCAT platform (ec_platform.so) sends and receives frames through
a NIC-driver DLL. Pick the driver that matches your transport:
Driver |
Transport |
Runtime prerequisites |
|---|---|---|
|
Linux |
|
|
AF_XDP socket / XSK (kernel fast path) |
|
|
DPDK poll-mode driver (kernel bypass) |
Hugepages, NIC bound to |
|
Virtual network (no hardware) |
None |
Set the driver configuration of the real-time network device ([rtnd0] for the first device) in
/opt/wmx3/platform/ethercat/PrtTcpip.ini. The UseNicDrvDll key selects
the driver; each driver reads its own keys from the same section.
ndd_sock_raw.so sends and receives EtherCAT frames through a standard
Linux AF_PACKET / SOCK_RAW socket, so the NIC keeps its normal
kernel driver and needs no extra setup.
Configure the port in PrtTcpip.ini:
[rtnd0]
UseNicDrvDll=ndd_sock_raw.so
ifname=enp4s0           ; kernel interface to bind (required)
rxprio=97               ; RX thread SCHED_FIFO priority (<=0 = default sched)
rxcore=2                ; pin RX poll loop to an ISOLATED core
Set ifname to the interface name reported by ifconfig; the
NIC_DRV_DLL_IFNAME environment variable overrides it.
Opening the raw socket needs CAP_NET_RAW, so run the nodes as root.
ndd_af_xdp.so sends and receives EtherCAT frames through an AF_XDP
socket (XSK), a kernel fast path: the NIC keeps its normal kernel driver,
so no vfio bind and no hugepages are needed.
An XSK receives only on the RX queue it is bound to, so collapse the NIC to a single queue first:
sudo ethtool -L enp3s0 combined 1 # one queue -> use queue=0
Configure the port in PrtTcpip.ini:
[rtnd0]
UseNicDrvDll=ndd_af_xdp.so
ifname=enp3s0           ; kernel interface to bind (required)
queue=0                 ; XSK binds to this RX queue
xdpmode=skb             ; skb=generic | drv=native | zerocopy=native+ZC
rxprio=97               ; RX thread SCHED_FIFO priority
rxcore=2                ; pin RX poll loop to an ISOLATED core
rxbusy=0                ; 0 = poll()/sleep (safe on a shared core)
                        ; 1 = busy-poll (needs a dedicated isolated core)
Set ifname to the interface name reported by ifconfig; the
NIC_DRV_DLL_IFNAME environment variable overrides it.
Creating the XSK needs CAP_NET_RAW + CAP_NET_ADMIN (CAP_BPF on
newer kernels), so run the nodes as root.
DPDK bypasses the kernel network stack, so reserve hugepages and bind the NIC to a userspace driver before starting the WMX3 engine.
Reserve hugepages (2 GB as 1024 pages of 2 MB):
echo 1024 | sudo tee /sys/kernel/mm/hugepages/hugepages-2048kB/nr_hugepages
grep -i hugepages_ /proc/meminfo         # expect HugePages_Total: 1024
Bind the EtherCAT NIC to vfio-pci (find the PCI address with
dpdk-devbind.py --status; pick a port that is not your management
link, because the bound interface disappears from the kernel):
sudo modprobe vfio-pci
sudo dpdk-devbind.py --bind=vfio-pci 0000:03:00.0
dpdk-devbind.py --status
Select the port in PrtTcpip.ini. ifname is ignored; the port is
chosen by id, pinned deterministically with an EAL allowlist:
[rtnd0]
UseNicDrvDll=ndd_dpdk.so
dpdk_dev=0000:03:00.0     ; allowlist the exact device, becomes port 0
rxprio=97               ; RX thread SCHED_FIFO priority
rxcore=2                ; pin RX poll loop to an ISOLATED core
Binding does not survive a reboot, so re-run modprobe and the bind
after each boot or automate them.
The virtual-network driver needs no hardware and takes no transport keys. The engine reads its virtual slave list from the same section:
[rtnd0]
UseNicDrvDll=ndd_vnw.so
numofslaves=1           ; number of virtual slaves (0 = empty network)
6. Test the WMX runtime#
Connect the EtherCAT slave hardware (a single servo drive is recommended for a first bring-up) to the configured NIC, power it on, then run the WMX3 command line tools to bring the engine up, scan the bus, and enable the servo:
cd /opt/wmx3/bin/
sudo ./wmx3-start-engine     # start the WMX3 engine
sudo ./wmx3-start-comm       # start cyclic EtherCAT communication
sudo ./wmx3-ec-scan          # scan the bus for slaves
sudo ./wmx3-ec-state         # show the EtherCAT master/slave state
sudo ./wmx3-clear-alarm      # clear any drive alarms
sudo ./wmx3-servo-on         # enable the servos
If you can heard the brizz of the servo, the engine is running and the EtherCAT bus is up.
sudo ./wmx3-stop-engine # stop the engine when done
7. Uninstall WMX runtime#
sudo dpkg --purge wmx3-installer